For as long as I can remember, I have never been able to get a decent tan to save my life. I am surrounded by gorgeous bronzed ladies and gents and sometimes I feel like the only “ghost” in the room. I fear I’m blinding them with my white, pasty legs and I sit and stare in envy of their gorgeous glow. What’s a fair skin girl to do?
St. Tropez Bronzing Mousse is the BEST self-tanner I have ever used so far. I can’t even believe I’m typing that, but it’s true. I never thought I’d find one that works so well. Many of you have probably heard about this product and are wondering why I haven’t tried this before and it’s a very simple answer. It’s kinda pricey! However, after using it and seeing how little I have to use each time I apply it, I know that this bottle is well worth the investment and I will have a great bronzed look at summer long.
To get a nice, even look, you need to make sure you do a couple of things before applying a self-tanner. I shave and exfoliate first (I did not use their exfoliant that they sell, just something I had at home) and I made sure to use a light-weight moisturizer (I used Nivea Express Hydration or Lubriderm) on areas especially like my ankles and elbows. It’s important to make sure your whole body is moisturized, but I applied a little extra to those areas.
Once I was dry, I put on the mitt that my product came with (I feel like this is a total must-have when using this product) and applied one-two pumps depending on the areas I was working with. For my arms, about one pump to start off with and then maybe a half to a full pump more to make sure things were covered.
I applied it very cautiously the first time I used it, but I think once you get the hang of it, you will know what you need to do as far as how many pumps to use per area. I applied the foam very gently at first to the tops of my legs and down. Same goes for my arms. I made sure to spread it around evenly and then I began to buff out the product in small circles.
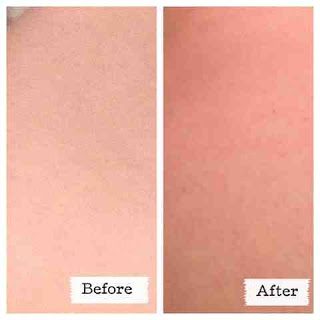
The foam is tinted, so it gives you a great visual to see where you have applied the product and where you missed it. That’s it! I did my legs, arms, and neck. I did not apply it to my whole body and I didn’t apply it to my face. I needed and wanted to do my back, but I’m not exactly sure how to do that without the help of my husband and he wasn’t home when I applied it the first time.
 |
|
A picture of my legs up close. You can see it produced a very natural color
|
It says to wait at least 60 seconds before you get dressed to make sure it’s dry, but I waited a little bit longer. I wasn’t sticky at all and nothing got onto my clothes. It also says to make sure to leave it on for four hours and to try not to get wet or sweat during those fours hours. After your times up, you can take a shower to wash it off.
During my “baking” time I did notice a tiny bit of an odor, but it was nothing compared to products I’ve used before and it really didn’t bother me. After I showered, I didn’t notice a scent at all and was left with a perfectly natural looking tan. You can thank their Aromaguard for the awesome no self-tanner scent.
I am using the St. Tropez again today as it’s a gradual tanner that allows you to build up color each time you use it. I am not trying to get dark, but I will keep applying it to keep up my nice summer glow.
The St. Tropez self-tanner is the perfect tanner for beginners to try. The bronzing mousse can be found anywhere St.Tropez products are sold, but I actually ordered mine from QVC where it was packaged with a mitt (I love QVC…they have everything).
Have you tried this product line? Are you going to? Let me know! I’d love to hear if anyone has used anything else in their product line before. This is going to be a must-have product for me from now on and I hope some of my fair skin ladies/gents with self-tanner issues give this product a try!
For more information and to see a demonstration of how to apply this product, click here. Prices for this range from $39 and up to $42.00.
 I saw the solar eclipse.





Leave a Reply